Mytutorlist.com - Free Tutoring Classifieds Blog Home Advertise on this site! Blue Pandemonium Art and Toys Email Me!

Showing posts with label carrying bag. Show all posts

Sunday, September 2, 2012

How To Make a Hedgehog Carrying Pouch With a Flat Bottom

 If you would like your hedgehog carrying bag to have a flat bottom, then follow these instructions to add an additional flat base to your carrying pouch.

***Please note that these tutorials are for you to make things for your own personal use, not to sell.***
First, finish sewing up the flannel to the fleece fabric on the hedgehog carrying pouch tutorial.

Then measure out fleece fabric approximately 8.75 x 2.5 inches.  The goal is to have a piece of fleece 4 cm too short on each side.  Cut out 4 of these.
Place one fleece rectangle on the bottom of the flannel section good side down (wrong side up).  Center it carefully and pin in place.

Sew the bottom edge.  Make sure to backstitch both ends.

Tip:  Use a ruler to measure both sides.
Do the same for the fleece side of the fabric.  Then do the same for the other fleece and flannel piece.
Place the two finished pieces together.  Line up all the sides carefully and pin in place.

Note:  The joint that you particularly want to line up is the one in the middle between the fleece and flannel.  It will be the most noticeable if it is not perfectly lined up.

Sew the four main sides.  Ignore the indented corners for now.  Make sure to back stitch.
Now you want to create the flat base.  Make your base look like the above picture.  This will line up the fleece bottom with the flannel side (on the fleece and flannel side).

Sew the new fleece and flannel edge.  Make sure to backstitch.
Do the same thing for the other corners, but leave one of the fleece + fleece (inside of pouch) corners.
For the last fleece + fleece corner, only sew the outermost edges.  Don't sew the middle.  Leave a 2 inch gap.  Make sure to backstitch.

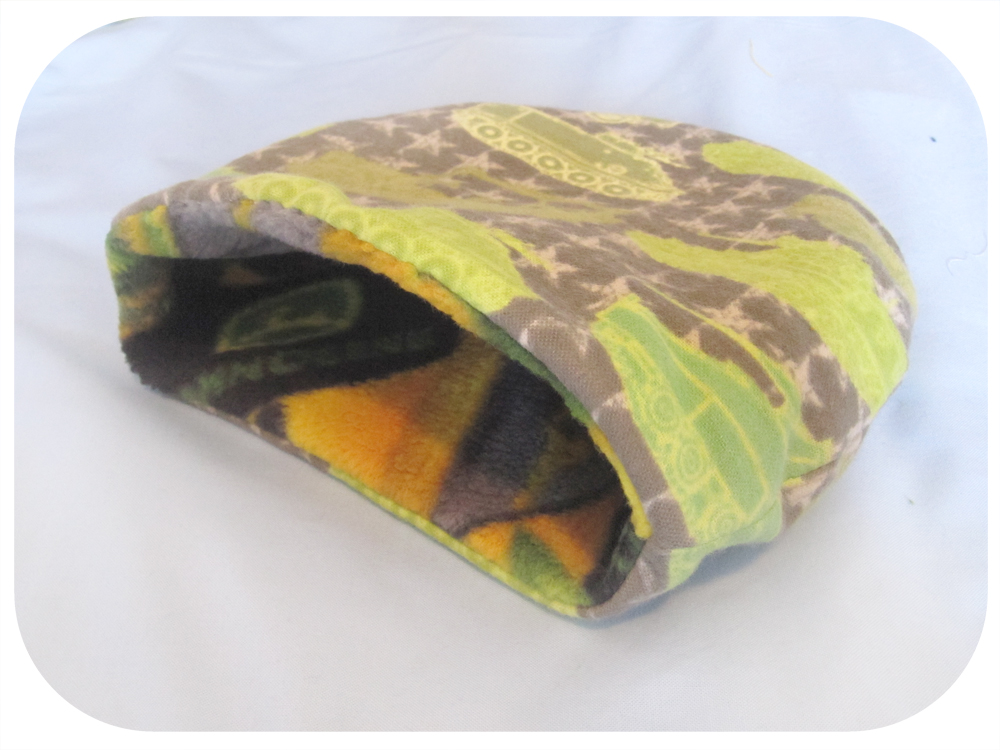
Turn the pouch inside out through this gap.
Your base should look like this.
For the remaining gap, tuck in the edges of the fabric and pull the fabric edge together taut.  Pin in place.   Close the gap with a hidden (ladder) stitch.  Make sure to overlap some of the existing stitching to create a secure joining.
Tuck the fleece side into the pouch.  Match up all the corners neatly.

Your flat bottomed pouch is done!

Optional resealable opening/firm base:

Idea #1
Don't sew the last gap shut.  Instead, sew thin strips of velcro to both sides of the remaining gap so that it can be opened and closed anytime.  This creates an opening where you can insert a sheet of plastic to make the base firm.  The plastic needs to be slightly smaller than the base so that it will fit inside well.

Remember to remove the plastic before washing the bag!

Idea #2
Cut a piece of plastic to fit slightly smaller than the base.  Sew a thin pillow case/envelope for it out of flannel.  Place on bottom of pouch to create a firm base.

Potential problem:  There is risk for little toes to get caught on the side of the bag and the hard base. 

Idea #3
Measure the base of the bag and use it as a template to create a removable base with 4 sides (an inner bag).  Sandwich your hard base between the base of your carrying bag and the removable bag.  Make sure to finish your edges so there are no loose threads for toes to get caught on.

Idea #4
Create an envelope for a plastic insert on the outside of the base.  Close the enclosure with velcro.
Let me know if you think of anything else!

Ideas For Plastic Types to Insert
Plastic canvas, thin plastic cutting boards (the kind that's just a sheet of plastic), plastic sheets for rolling dough on, chloroplast, dollar store placemats, report covers

You can also use cardboard, just discard it when it's soiled. Remember to remove it before washing!!! (or you'll be very sad...and your pouch will be shreddy-coated)

Optional Bigger Pouch:

The finished base in this tutorial is approximately 3 inches wide and 7.75 inches long (7.5 cm x19.5 cm).

Wider Front to Back
If you would like a wider base front to back, add an inch to the width of your fabric on both sides.  Also add an inch to the width (shorter side, not length) of the fleece fabric strips for the base.  This will make your base about 1 inch wider (so 4 inches wide) if you have 1/2 inch seams.

Wider Side to Side
If you would like a wider pouch horizontally, add an inch to the width of your fabric on both sides.  Also add an inch to the length of the fleece fabric strips for the base.  This will make your pouch wider by about 1 inch (so 8.75 inches) wide on the bottom.
Move on to the carrying straps tutorial to make the straps for your carrying pouch!

Don't forget to post your finished pictures in the Flickr group here. I'd love to see what you make!

Don't want to make your own? Email me at bluepandemonium (at) hotmail.com and maybe I can make one for you! I also have some fleece pouches listed in my Etsy shop.
Happy Sewing!


*************************************************************
*************************************************************

Have the tutorials and information on this blog helped you? Then please consider supporting this blog with a generous donation!

Wednesday, July 11, 2012

Hedgehog and Small Animals Tutorials - Sewing and more!

To keep things organized, here are some of the tutorials available for making cool things for your hedgehog (or other small animal).  Please note that these tutorials are for you to make things for your own personal use, not to sell.
Summer Flannel Pita Pouch - perfect for hot weather and more airflow, also fits perfectly into your dome.
Fleece Pouch (8 x 10 rectangle) - perfect for sleeping in, snuggling, hiding, burrowing... you get the gist  :)
Quilted Fleece Top for Fleece Pouches - use up those fleece squares and make your pouches awesome!
Poggy's Special Inside-Out Pouch - a modification of the rectangular fleece pouches into a reversible holiday & non-holiday pouch
Fleece Pouch (10.5 x10.5 inches square) - perfect for converting into a carrying pouch!
Flat Bottomed Carrying Pouch (10.5 x 8 x 3 inches) - perfect for making into a flat bottom carrying pouch!
Carrying Pouch Straps - ties a cute bow stylishly around the side of your neck.  Why not cuddle with your hedgehog and look good too?
Tree Dome Cover - very general instructions for how to make a cosy for your Living World dome that looks like a short, fat tree.
Fleece Cage Liners - washable, reusable bedding for your little friend!
Start a Mealworm Colony - keep your store-bought mealworms fresh and tasty (aka FAT) by keeping them in dry oatmeal and giving them a carrot each week.  If you're lucky, your colony will become self-sustaining!
Hedgehog Dolls - just purchase the PDF from my shop and you're well on your way to two adorable new little friends.  The instructions are 14 pages and include 39 photos with step-by-step instructions.

Hedgie Hat - available as an instant PDF download from my shop.  The instruction are 11 pages and include photos and the template for the reversible hedgie hat.  The mushroom decoration templates are not included, but the instructions for how to make them are.


Don't forget to post finished pictures of your projects on the Flickr page here or email them to me bluepandemonium (at) hotmail (dot) com.
*************************************************************
Have the tutorials and information on this blog helped you? Then please consider supporting this blog with a generous donation!
 

Tuesday, July 10, 2012

How to Make a Hedgehog Carrying Pouch - The Bag

Here's a tutorial for how to make a hedgehog carrying pouch with a cute bow strap.  First, let's start with the bag itself without the straps. 

***Please note that these tutorials are for you to make things for your own personal use, not to sell.***
MATERIALS NEEDED
  • Sewing machine
  • Fleece fabric
  • Flannel fabric
  • Thread
  • Needle
  • Ruler

CUTTING & SEWING
Outside:  Measure out a rectangle of flannel fabric 12 x 8 inches in size.  Cut out two.  You can also use fleece only if you want.

Rim:  Measure out a rectangle of fleece fabric 12 x 5 inches in size.  Cut out two.
Place one fleece fabric on top of the flannel fabric with good sides facing each other.  Line up the top edge and sew in place.
 Lay the fleece and flannel piece on top of the inside fleece fabric and cut out two pieces.  This will give you two inside pieces that match the size of the outside pieces.

Lay one inside fleece on top of the flannel piece with good sides facing each other.  Line up the top edge and sew together.

Do the same thing with the other flannel section and the other new inside fleece piece.

*** If you would like a flat bottomed pouch, go to the flat bottomed pouch tutorial now. ***
 Place the two fleece and flannel pieces on top of each other with good sides facing each other.  Pin in place.
 Sew around the entire shape, but leave a 2 inch gap on the inside fleece side.  Make sure to backstitch around the gap.
 You can reinforce the corners by sewing diagonally across them.
 Turn the pouch inside out through the 2 inch gap.  Now you need to close the gap.  Tuck in the edges of the gap in and pinch the gap closed.
HIDDEN STITCH
Thread a needle and tie a knot.  Make a stitch overlapping the existing stitching around the edges of the gap a little.  Stitch on one side of the gap, go directly over sideways, make a stitch on the other side of the gap.  Go in a ladder stitch from side to side until the gap is closed.
When you are done, tie a secure knot.  Stitch into the pouch and pull the thread taut before snipping it.
Push the fleece side into the flannel side and match the corners up neatly.  You are done!
The pouch will measure about 10.5 inches x 10.5 inches.  If you only want a fleece pouch, you can stop here.  If you want to turn this into a carrying pouch, move on to the next tutorial on how to make the cute bow straps!
Don't forget to post your finished pictures in the Flickr group here.  I'd love to see what you make!

Don't want to make your own?  Email me at bluepandemonium (at) hotmail.com and maybe I can make one for you!  I also have some fleece pouches and hedgehog flannel fabric listed in my Etsy shop.

Happy Sewing!

*************************************************************
*************************************************************

Have the tutorials and information on this blog helped you? Then please consider supporting this blog with a generous donation!