
Mytutorlist.com - Free Tutoring Classifieds Blog Home Advertise on this site! Blue Pandemonium Art and Toys Email Me!

Showing posts with label diy. Show all posts

Thursday, June 4, 2015

Frilly Hedgehog Pincushion - Tutorial

Some corsage pins I ordered arrived, but they came in a flimsy ziplock bag.  For safety reasons, ahem, I had to make a new pincushion... with ruffles. 
I had previously sewed some swatches of fabric and backed them with cotton batting for another project, but it didn't work out so I had this quilted material just lying around in my scrap bin.  This little project was a good opportunity to use up this fabric.

If you want to make something similar, this is how I made this:

Materials
Fabric
Cotton batting
Polyfil Stuffing
Thread
Needle
Sewing machine + hand sewing
Lots of double sided ribbon (Each row is about three times around the pouf)
Peanut butter jar lid (or other similar lid)
Other lid about 2-3 times as big as the peanut butter jar lid

Instructions (Sorry!  No photo steps in this tutorial!)
(Note: this assumes that the fabric is already backed with batting.)
Preparation
1. Cut one circle about 1 inch bigger all around than the peanut butter jar lid
2. Cut strip of fabric long enough to wrap around the outside of the lid plus about 1 inch all around
3. Cut large circle about 2-3 times the size of the base (bigger circle makes bigger mushroom top)
4. Cut 3 strips of ribbon that are long enough to wrap at least three times around the outside of the dome.  These are for 3 layers of ruffles.
Dome Top
5. Create running stitch around the entire perimeter of the dome top circle.  Pull to create a draw string that closes the circle into a pouch.  Stuff pouch very full with stuffing.  Pull string tight and secure in place (knots).  You should have a puffy ball.
Base
6. With sewing machine, carefully sew the long strip of fabric around the base circle (wrong sides facing out, right sides facing each other.  When you turn it the right side out, you should have a cup that the peanut butter lid can fit into.
7. Sew running stitch around top perimeter of the cup and pull tight so that the edges pull in to the middle.  Stuff full with batting or fabric scraps.  Secure thread in place (knots).
Ruffles
8. Sew (hand-stitch) the end of one strip of ribbon to the side of the dome top.  
9. Create two stitches of a very loose running stitch.  
10. Push ribbon down the thread to create first ruffle.  
11. Sew ruffle down to side of dome. 
12.  Keep creating ruffles and sewing them down around the entire side of the dome until a full circle is created.  Adjust how tight you want your ruffles as you go and keep an eye on how much ribbon you have left to ensure that you have enough to go around the entire circle.
13. Create two more circles of ruffles.  You should have one ruffle about half way down the side of the dome, one at the bottom edge of the dome, and one ruffle layer in between those.
Put it All Together
14. Center the base in the middle of the bottom of the dome.
15. Use a ladder stitch to join the top and bottom (hand-stitched).  I sewed the bottom to the last ruffle layer as that was easiest.
16. You are done!  Enjoy your new ruffly pincushion! 
I had a lot of scrap fabric and fleece so I stuffed my pincushion with that instead.  The downside is that scrap fabric is very dense and harder to stick thicker needles (ex. corsage pins) easily into.  You may wish to use batting in the top and fabric scraps only in the base so that you can more easily push needles in.  Smaller pins and needles will have no problem pushing into fabric scrap.

Have a great week!

Friday, May 22, 2015

Roll Up Make Up Pouch Completed

I finished a new roll up make up pouch for myself!  
This is my old one.  It didn't have enough spots for my brushes and it was a pain digging around to find eyeliner colours in those typical make up cases.  Well, the problem is gone now!
Ta da!  A custom-made make up pouch with elastic spots to fit each brush I own.  Also, pockets to slide in all the eyeliners.  The colour indicator faces up out of the pouch so I know exactly which colour I'm pulling out.  
The best part of all?  There is a real zipper pouch built in on the side that stores all the eyeshadows, blushes, pluckers, scissors, etc.  For ease of travel, the whole thing rolls up and is tied closed.  It's magic!
I took photos of all the steps as I was making it so maybe I will put together a tutorial one day.  Let me know if it's something you would be interested in.  For now, I am really enjoying this new pouch.  I'm so glad I learned how to sew.  It's really coming in handy.

Have a great day!

Sunday, January 11, 2015

DIY Happily Ever After Wedding Favour Tags

I've been working on favour tags for my wedding in October and came up with some cute tag designs.  I used cardstock that had white on one side and a lovely water colour pattern on the back with some shimmering details.  I printed in colour for the blank side and printed just text onto the patterned side.  I really liked how the back of my tags turned out and decided to make a set of tags for my shop with a similar effect.
I gave these tags a watercolour look, plus some lace details.  The sunset coloured tags have text and writing in the background instead of the lace detail.
If you would like to use these tags for your wedding favours, just purchase the PDFs from my store, print them in colour onto cardstock, and cut out your tags with regular or scalloped edging scissors.  The files download instantly.

Have a great week!
xoxo

Friday, December 12, 2014

Gathered Coin Pouch Tutorial with Templates

A family member requested a small coin pouch that could hold ID and credit cards and would look nice for putting into her purse at parties.  I felt that my usual coin pouches were too casual looking and I wanted something a little prettier since she said it was for dressing up.
I came across the gathered clutch tutorial by Noodlehead, I liked the look of the gathered fabric with a band across it, so I created my own pattern for a smaller coin purse.
I chose a large patterned floral fabric that I thought was suitable for a dressier look.  My family member seems to like her red purses, so I figured I would go with something with red in it while not being overpoweringly so.  Rather than have a different coloured band, I went with a band in the same fabric for a more subtle, dressier look.
The end result is rather appealing.  I added a satin ribbon in a matching bronze colour to dress it up a little more.
The back I left simple.  The fabric was pretty enough that I didn't feel the need to make it so complicated on both sides.
I created a tutorial with templates.  If you would like to make a gathered coin pouch of your own, you can download the pattern instantly from my store.  The pattern is 15 pages, has lots of photos, and has easy-to-follow instructions.

Happy Sewing!

xoxo

Thursday, December 11, 2014

DIY Christmas Wreath 2014

With Christmas fast approaching, I gathered supplies to make my annual home-made Christmas wreath.  After spotting some small "gourmet" Christmas wreaths at a local florist for upwards of $50 each, I figured this was a much more economical decision.  Plus it's fun.  Perhaps you would like to make one of your own too? 
I began my project by collecting greenery from the neighborhood.  There was a wind storm recently so lovely branches of evergreens are strewn all over the street.  It's fantastic, because I found branches with small pinecones still attached!  An excellent find.  I collected all kind of various shrubbery, including some unusual looking flower bud sprays from my neighbor's overgrown ivy. 
I formed piles of the different greenery and then laid them on my wire wreath shape in small bundles.  You can refer to this detailed wreath tutorial I made for a previous year here.  Unlike previous years where I cut strips of wire and tied each bundle on, I just secured the first bunch by twisting the wire to itself and then used the wire spool to wrap two times over each bundle.  Pull snug, but not so tight that the wire wreath shape warps.  This is a much more efficient way to create your wreath and it should be easier to take the greenery off at the end of the holidays.
I alternated between different kinds of greenery as I moved around the wreath.  Look how nice those ivy buds look as sprays around the wreath.  I also quite like how the pinecones stick out in natural places since they are still attached to the branches.  It's quite convenient.  I don't know how long they will stay attached, but I can always wire them back into place if they fall off.
It was dark when I finished the wreath, so the lighting isn't the greatest, but you can see how florist-quality this wreath is compared to something you might buy premade at Costco or Home Depot.  It's loaded with unique greenery from the neighborhood.  
I made a nice, big, wired red bow from some ribbon I bought last year on sale at Sears and tied it on with wire.  I liked it simple like that, but my mother wanted more red stuff on it.
So I added all of the artificial berries and apples that I had left over from last year's wreath.  The effect is rather stunning.  It think it was a good idea to add the decorations at the end since they really stand out.
You can compare it to last year's wreath where the ornaments were added at the same time as I added branches.  They got a bit too covered up, I think.  Also, last year, I did not experiment with adding different kinds of greenery.  I mainly used pine/Christmas-type greenery.  The big, red ribbon was also a good new addition, I think.
I had a lot of greenery left over so I covered all the railings outside my house.  This is where I also put some of the wild holly that I found, plus some sticks with moss on them.  I like moss covered stuff, and it looks nice and natural.  For the railings I used strips of wire to tie the branches on.  It seemed wasteful to use the wire wrapping method since the railings are so wide and harder to maneuver around.

If you decide to make a wreath too, send me a picture!  I would love to see how yours turn out. 

Happy Christmas Planning!

xoxo

Sunday, December 7, 2014

Water Distressed Paper Poinsettias Tutorial

Christmas is almost here and I need decorations.  If you're looking for something fun and pretty to make, you can try these water distressed paper poinsettias.  They look pretty nice on tables, wreaths, etc.   
To make these lovely, complicated blooms, you will need the following supplies:

Silhouette Cameo Paper Cutting Machine (or mad paper cutting skills)
Red cardstock paper
Dark green cardstock paper
Light green or yellow cardstock paper
Watercolour paints
Make-up wedge sponges
Optional: Fine paintbrush
Water
White Glue
Drying surface (ex. tin sheet)
Painting surface (ex. white paper)

To start, cut out your poinsettia flower petals and leaf shapes.  
I used this template from the Silhouette online store. You can also get the template that doesn't have the wreath.  As you can see, you don't have to go through the trouble of water distressing these poinsettias, they look pretty good with just rolled up petals.  I just like to make my life more difficult by attempting to one-up everything  :)
I filled 8.5 x 11 sheets with either petals (red), leaves (dark green), or flower centers (pale yellow green) in Silhouette's software.  
I printed out about 2 red petal sheets, one green leaf sheet and one light green centers sheet.
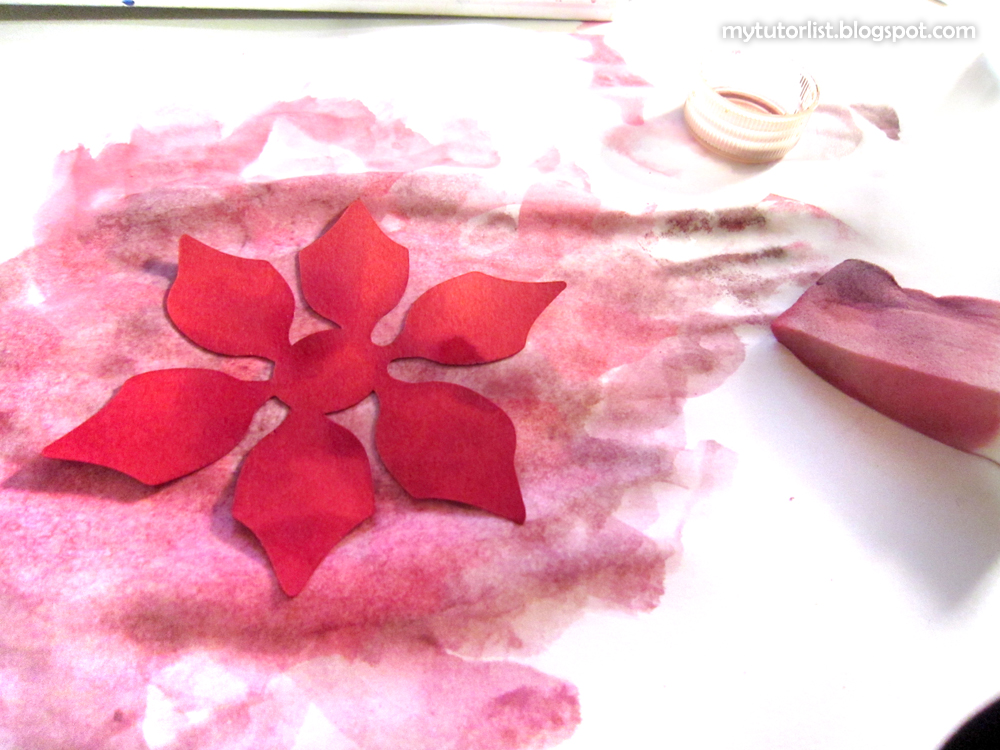
 Place your flower petals on your painting surface (I used a plain sheet of white paper).  Get your sponge wet and load it with dark red watercolour paint.  Make it dark enough to show your on your petals.  Mix in some dark green or black to make it show up as needed.  Cover both sides with a wet layer of paint.
While it is still wet, fold the petal center creases.

 Scrunch up the petals.  Be careful not to tear the petals off.
Close up the flower in the center by squishing the center together from the bottom.

 Gently open up the petals.  Keep the center crease deep so that it looks like a leaf and gently bend the petals so that they curve open.  It helps to pinch the center crease while using your other hand to smooth the petals open and bend the tip backwards.
 Arrange your petals in the way you want them to appear or in a more closed shape until the petals are dried.  You can always open them more once they are dried.  If you mess with them too much while they are wet, you might accidentally tear off a petal.
 Be patient and wait for the petals to dry.  I place mine on an aluminum sheet over my oil heater in my room so that they dry faster.  Be careful to prevent a fire if you do this.  You can also place them under a lamp to dry.

Once they are dry, you can put a generous blob of white glue in the center and any spots where the next layer of petals will overlap.  Place a layer of petals on top and press together.  Allow them to dry fully.
The idea is to put leaves at the bottom, then largest petals on the bottom, and smaller petals to the middle so it looks like a real poinsettia flower.  Look at photos of poinsettias to see what it should look like.  Add about 3 layers of petals or more until you get the look that you like.
Add the flower centers in the middle.
I made my flower centers in light green and used bright yellow paint on them.  I added extra yellow paint on the round balls and a touch of green in the middle.  Once they were painted, I closed the centers up gently and lightly pressed on the balls so that they would bend in different directions instead of standing straight up.
Add a generous daub of white glue to the center and push the center into place.  The result is quite attractive.
These flowers take a lot of work, but they look look quite realistic in terms of the way the petals are wrinkled and creased like real poinsettia flowers.  Experiment with adding more and less paint and different colours of paint in order to get the look of the flowers and leaves that you want.

Enjoy and Happy Christmas Planning!

xoxo

Wednesday, November 19, 2014

DIY Water Distressed Paper Flowers Tutorial

I've been having fun making water distressed paper flowers the last few days.  
They are easy to make and they look quite nice.  I am thinking about using them for my wedding decorations next year.  What do you think?
By varying the petal shapes, colours, and centers, I have made a lots of different types of flowers.
I even experimented with making some anemones.  It's fun  :) 
I have amassed quite the collection of them already...
I even made different kinds of leaves  :D 
If you would like to know how to make these, the tutorial can be found here on my wedding blog.

Have a great day!
xoxo