Mytutorlist.com - Free Tutoring Classifieds Blog Home Advertise on this site! Blue Pandemonium Art and Toys Email Me!

Showing posts with label card. Show all posts

Tuesday, December 10, 2013

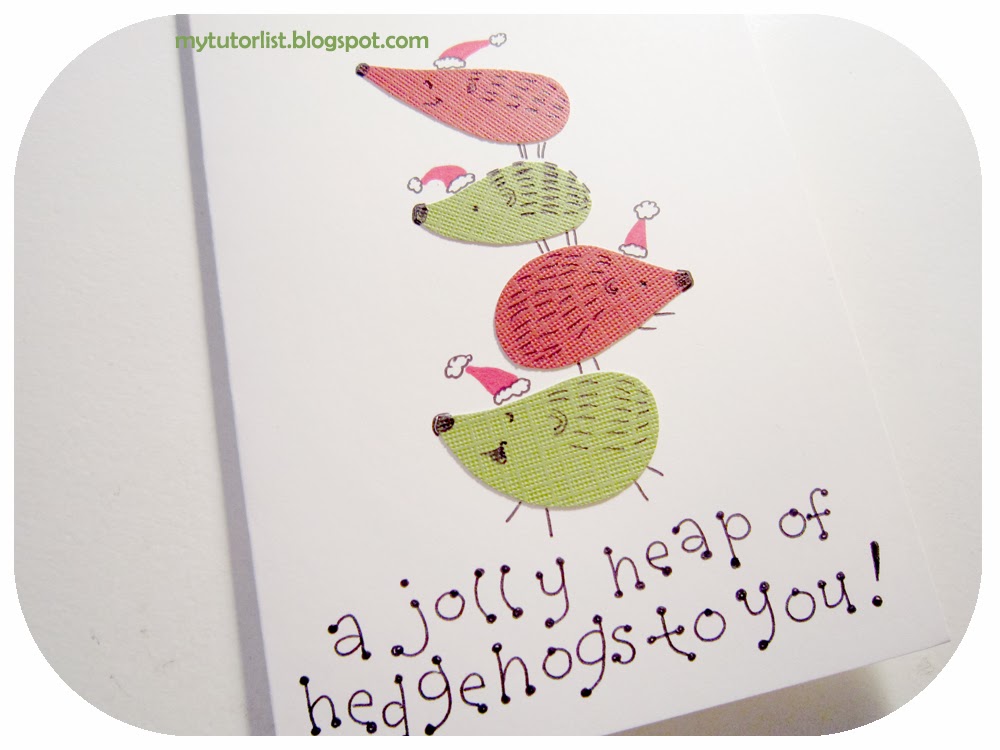
A Jolly Heap of Hedgehogs Card Tutorial

Here's a cute little tutorial on how to make hedgehog cards for Christmas.
You will need the following supplies:

Hedgehog shapes in cardstock
Cream coloured blank cards
Black ink pen
Red Sharpie marker
Green Sharpie marker
Start with some hedgehog shapes.  I used the textured cardstock hedgehog shape stickers from my shop.
 Arrange the shapes in an interesting stack on your card.
 Peel the backing on the stickers and stick them to the card.  Start drawing hedgehog eyes, nose, and quills on the stickers with the black ink marker.  I like to make the nose extend out of the shape a little.
 Fill in details on the other hedgehogs.
 Add little red hats with the red sharpie.  Draw the pom pom with black ink (outline only).  Add green leaves with the green Sharpie.  Draw the berries with black ink (outline only).
 Here's a different one with white fluff under the hat drawn as an outline with black ink.
 I added the words "a jolly heap of hedgehogs to you!"
 Another one  :)
 Here are some hedgehogs in blue...
 ... and some hedgehogs in red and green!  So fun!
 Now your cards are ready to be written in and sent to your loved ones!
If you don't want to make your own cards, you can also print out some cute hedgehog cards using these PDFs.
Enjoy!  and Happy Holidays!

Thursday, April 29, 2010

More Tags in the Shop! Blue Birthday Cakes, Ninjas, and Pears!

More tags are in the shop, and they're cuter than ever! My best friend is a blue gal, so I had to make some more birthday cake tags in blue. And ninja tags!

Ninjas are everywhere, but you'll never see one... until just before you die! And even then, you might just feel a breeze and a notice a blur of black. That's how awesome they are! How awesome is it then to have ninjas deliver your birthday cake!?! Oh wait, I just said you wouldn't see them until just before you die... well, this is an exception, so don't miss out.
Finally, pears. I don't know why I love pears so much, but I do. They have a nice shape, nice colours, and they taste good. I personally prefer the crisper pears for eating over the mushy ones. How about you?

All of these new tags are waiting for you in the shop.

Have a great day!

Friday, November 27, 2009

Happy Birthday To Dad

Today is my dad's birthday! He was really excited about getting a year older and was getting ready for it yesterday :) I love how he's such a kid sometimes. It really adds a lot of enthusiasm to life.This is the card I whipped up for him today. I used one of my newest ACEOs. This design is very versatile. It comes in rainbow colours, Christmas colours, orange tones, and red tones. I picked the orange one since it's cheerful and he likes orange/gold tones.
Inside are lots of present boxes. I figure my family can add doodles or little messages inside of them when they sign the card.

I hope he has a fantastic birthday. Yay for another happy, healthy year of life!

Wednesday, October 21, 2009

New Tags And Who Won The Anti-Stress Bot Giveaway

I am so delighted to show you some new tags I have available in the shop. I have had a lot of comments on how much people have liked the "Why Does It Always Rain On Me?" painting, and recently I've been asked if I could make some tags out of the image. Well, your wish is my command! Here are some really adorable "Why Does It Always Rain On Me?" tags! The edges have been scalloped to give it a really cutesy feel (as if the image wasn't cute enough), and the tags are tied with satiny blue curling ribbon. These tags would really brighten up any package, despite the unfortunate little blue bird's predicament.
The tags are backed with cardstock in a coordinating, but relatively simple pattern. This makes it perfect for writing a quick To and From, or a thoughtful little note from you.

They are packaged in a cello sleeve for protection and pleasing presentation. You could include a set in a letter to a friend, or as a gift enclosure in a Christmas card.Next up, is a new set of Little Singing Bird Tags. They are back by popular demand! This time, they are made from pretty cardstock cut outs instead of fabric cut outs. This particular set looks really pretty with the golden floral print and gold ribbon.

Grab them quick, if they fit your fancy as I think they would look endearing on any present.
These tag sets and others can be found in my Etsy shop.
Now for the moment you've all been waiting for - the results to the Anti-Stress Bot Marigold Seed Giveaway!

... drum roll, please!

The winner of the Anti-Stress Bot Marigold Seed Giveaway is...
That makes the winner AIK!!! Congratulations to AIK, and thank you everyone for playing! If you haven't entered the giveaway from Marang97 for a lovely carnation flower of your choice, enter now!

I hope you have a wonderful day!

Saturday, October 17, 2009

Trading For Bunnies

My recent new love is trading on Etsy. You find equivalent value items between your two shops, and just send them to each other! You still check out, but neither party pays, and Etsy still gets their fees. Everyone is happy :)My first trade arrived! Hurrah! A package pour moi!
I eagerly tear it open!
Oh look, a cute foam heart sticker holding a message for me! That's a nice touch.
And then for the best part! Bunnies, bunnies, bunnies! Postcards, magnets, cards... I'm in bunny heaven!
Oh bunnies, how do I love thee? You are just so darn adorable. Sigh, those cute floppy ears...

Thanks so much, yenspiration!

Have a happy bunny-filled day! Don't forget to enter the giveaway!

Tuesday, September 22, 2009

Flying Bird Card Tutorial

It was my friend's birthday today, so I decided to make her a card last night. I thought you might like to see the process, so here it is in tutorial form.

To make this card, you will need the following supplies:
  1. Double-sided cardstock
  2. Double-sided tape
  3. Normal tape
  4. Ink pen for drawing details
  5. Thin ribbon for decoration
  6. Fancy edging scissors (scallop)
  7. Regular scissors
First, cut your double-sided cardstock into an 8 inch by 5 inch piece.
Make a crease down the middle. I used the grids in my paper cutter and just slid my nail down a ridge. If you don't have something like this, just skip to the next step. The crease just helps make the fold cleaner.
Fold your paper in half.
Trim off about half a centimeter for the front edge. This is just to make scalloping the edges next a little easier.
Scallop the edge using the fancy edging scissors.
Cut out a bird shape in a contrasting colour to the front of your card. Cut out 2 beak shapes.
Tape the beak shapes into place on the back of the bird.
Use double-sided tape to paste the bird shape to the front of the card.
Use an ink pen to draw eyes and stitch lines around the border of the bird shape.
Cut 2 identical wing shapes.

Hint: fold paper over and cut 2 shapes at once.
Tape one wing to the bird using double-sided tape.
Fold the second wing in half.
Draw stitch lines around the border.
Use double-sided tape to attach the 2nd wing to the upper side of the 1st wing. This gives the wing a 3-dimensional look.
Use a small hole punch to punch holes along the side of the scalloped edge. I used a ruler to draw a straight line where I wanted the holes and punched one hole every 3 bumps on the scalloping.
Tie a thin ribbon around the center of your card with the bow on the outside.
Trim the ribbon ends to match the length of the loops of your bow. Cut on an angle.
The inside will have a thin ribbon running down the center.
Cut a wavy box shape. This is easy to do since you don't have to cut straight at all and it can be approximate. I chose a lined pattern because I will be writing my message in this box.
Use double-sided to tape to paste the box to your card. Tuck the box shape closer to the center so that you won't see it through the hole punches when you have your card closed.
Use an ink pen to roughly outline the box shape. Keep the line loose and outside of your box shape by a bit.
Draw a curly bow on top. Now the card is ready for your thoughtful message.

Hint: For an alternate design, you could put this curly box shape design onto the front of a birthday card!
Ta da! All done! Won't your friends be impressed with this marvelous creation!

Don't forget to post photos of your finished work on the Flickr page here.

Happy Crafting!
Arts and Crafts Tutorials